
In brief: Build a raised bed cabinet by combining a sturdy cabinet frame with a waterproof interior. Choose durable timber such as larch or Douglas fir. Add a watertight liner and a practical drain for excess water. This gives you a mobile raised bed with integrated storage for tools or growing medium.
Build Your Own Raised Bed Cabinet: Practical DIY Guide
Combine space-saving gardening with clever storage. A raised bed cabinet offers both: an ergonomic planting area and convenient space for tools or growing medium. We show you how to build one.
What Is a Raised Bed Cabinet?
A raised bed cabinet combines two functions. The top serves as a raised planting bed, while the lower section provides protected storage. This design is ideal for small gardens, patios or balconies.
You can garden at a comfortable, back-friendly height while keeping your garden tools dry and close at hand. The cabinet also gives your outdoor space a neat, structured appearance.
Expert tip
Plan plenty of storage space. A height of 60 centimetres allows you to store watering cans or bags. Install simple shelves made from phenolic-coated plywood for better organisation.
What Are the Benefits of This Design?
You gain growing space without using additional floor area. Making use of vertical space is efficient. The raised bed is mobile and can be moved when needed.
The cabinet construction protects the sensitive bed filling from cooling at the sides. It warms up earlier in spring, extending your gardening season.
Choosing Timber for Outdoor Use
Choose weather-resistant timber. Larch and Douglas fir are naturally durable, so they do not require chemical treatment.
Pine or spruce is more affordable, but must be treated with a protective coating. Choose a wood stain specifically designed for garden timber. These products allow the wood to breathe.
The service life of a raised bed depends largely on the quality of the timber. Invest in pressure-treated wood or naturally durable local timber. The extra cost will pay off over the years.
How Do I Plan My Raised Bed Cabinet?
Start by choosing the location. Full sun is ideal for most vegetable plants. On balconies, check that the surface can support the weight.
Choose a specific size. A width of 120 centimetres allows you to work comfortably from both sides. The planting area should be 80 to 100 centimetres high.
Sketch your design. Take the dimensions of standard timber panels into account to minimise offcuts. Plan all screw connections in advance.
The Right Tool List
You need a jigsaw or circular saw for precise cuts. A drill with wood bits and screwdriver bits is essential. An angle finder and spirit level will help ensure a straight build.
For sealing, you need sharp scissors and a staple gun. A ratchet wrench makes fastening the screws much easier.
Important note
Protect your hands. Always wear work gloves when sawing and screwing. Safety glasses prevent wood chips from getting into your eyes. Work on a stable surface.
Building Instructions: How to Build a Raised Bed Cabinet Step by Step
Follow these systematic instructions. We describe how to build a freestanding wooden model.
Step 1: Cutting the Timber Components
Cut all components according to your plan. You need four side panels for the cabinet body. Two of them are taller and form the back wall of the planting area.
Cut the base panel for the storage compartment and the base of the planting container. Make the door or front panel for the cabinet section. Sand all edges smooth.
Step 2: Assembling the Cabinet Frame
Join the three side panels and the base panel to form a sturdy U-shaped frame. Use angle brackets and stainless steel screws. Make sure all corners are exactly square.
Leave the front open for now. You will fit the door later. Check the stability of the frame and reinforce it with additional battens if necessary.
Always drill pilot holes before screwing. The hole should be slightly narrower than the screw diameter. This prevents the wood from splitting along the grain. It is particularly important at the corner joints.
Step 3: Building and Sealing the Planting Container
This is the most important step. The container must be completely watertight. Build a box from the taller side panels and the boards for the container base.
Fasten the parts from the outside. The screw heads remain on the outside, so they do not penetrate the sealing layer inside.
Additional advice
Use pond liner with a thickness of 0.5 mm. It is UV-resistant and flexible. Fit the liner in one piece and avoid seams in the lower corners, where water pressure is highest.
Secure the liner to the top edge of the container with aluminium nails or a wooden strip. Fold over and cover the excess later. Do not cut the liner too short.
Step 4: Drainage and Base Protection
Drill several drainage holes in the base of the container. A diameter of 10 millimetres is sufficient. Cover the holes with water-permeable weed-control fabric.
Add a five-centimetre layer of expanded clay. This material provides drainage and prevents the root zone from standing in water. The fabric stops soil from filtering down into the drainage layer.
Do not forget the base. Place the cabinet on feet or paving slabs. This keeps the timber away from the ground and helps it dry faster after rain. A cover tarp for garden furniture protects it in winter.
Step 5: Fitting the Door and Shelves
Fit the door using suitable hinges. Magnetic catches keep it closed. Install simple shelves made from phenolic-coated plywood inside the cabinet.
Secure the shelves with angle profiles or glued battens. This makes them easy to remove, and you can adjust their height later.
Filling the Raised Bed Cabinet: The Right Layers
Do not simply fill it with soil. A layered filling works for you, providing heat as the materials decompose and releasing nutrients slowly.
Layer 1: Coarse Material
Fill the bottom 20 centimetres with coarse garden waste, such as branches, twigs or wood chippings. This layer provides ventilation from below.
Layer 2: Green Waste and Leaves
Add a 15-centimetre layer of grass clippings, leaves or straw. This material decomposes more slowly and forms the basis for humus production.
Layer 3: Mature Compost
Add 20 centimetres of partially matured compost. This supplies the main nutrients for your plants and activates soil life.
Layer 4: High-Quality Garden Soil
Finally, fill the container with high-quality fine garden soil or special raised bed soil, stopping 5 centimetres below the rim. This space holds watering water.
Caring for and Planting Your DIY Project
Water regularly, but avoid waterlogging. Keep the drainage holes clear. Nutrient levels are very high in the first year, so start with heavy feeders such as tomatoes, cabbage or courgettes.
In the second year, plant medium feeders such as lettuce or carrots. In the third year, light feeders such as beans or peas are ideal. This makes the best use of the available nutrients.
Protect your cabinet during the cold season. A transparent cover for garden furniture keeps snow and frost out while still letting light through.
Ready-Made Alternatives
Don't want to build one yourself? There are elegant ready-made solutions. The
offers a four-piece raised bed with a rattan-effect finish. It instantly brings a Mediterranean feel to your patio.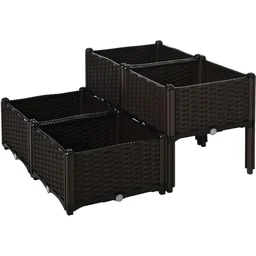
For vertical gardening, the
is ideal. The 5-in-1 “Spitzbergen” planting system is slim and space-saving. You can fit it with a variety of planting inserts.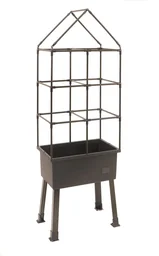
These systems are ready to use straight away. They save time and guarantee professional workmanship. When choosing one, look for sturdy materials and built-in drainage.
Ideas for Creative Design
Let your creativity run free. Treat the wood with coloured wood stains. Grey or olive green are subtle, modern shades.
Attach small hooks to the side panels. Use them to keep watering cans or gardening gloves within easy reach. A small shelf on the side provides space for pots.
Combine edible and ornamental plants. Plant colourful flowers around the edge. Grow your vegetables in the centre. This turns the raised bed cabinet into a real focal point.
With these ideas, nothing stands in the way of your building project. You will create a unique garden feature that combines functionality and style. Start planning today.
Frequently Asked Questions
- Which wood is best for a raised bed cabinet?
- Use pressure-treated wood or durable varieties such as larch, Douglas fir or oak. These types withstand moisture and do not rot as quickly. Avoid untreated spruce. Applying an environmentally friendly wood preservative oil significantly extends the cabinet's lifespan.
- How can I prevent waterlogging in a raised bed cabinet?
- Drill several drainage holes in the bottom of the planter. Cover them with a layer of drainage material such as expanded clay or gravel. Place a water-permeable fleece over the top. This allows excess water to drain away while preventing the soil from being washed out. Check the holes regularly for blockages.
- Can I convert an old cabinet into a raised bed?
- Yes, this is a great upcycling idea. The cabinet must be structurally sound. Remove all drawers and doors. Line the inside with a robust pond liner or plastic planter. It is important that the material can withstand damp soil. Check the load-bearing capacity of the shelves beforehand.
- How deep should the soil be in a raised bed cabinet?
- Plan for a soil layer at least 40 to 50 centimetres deep. Deep-rooted vegetables such as tomatoes or carrots need this space. Fill the bed in layers: coarse material at the bottom, followed by compost and, finally, high-quality garden soil. This creates a nutrient-rich, well-drained growing environment.
- Which plants grow well in a vertical raised bed?
- Plants with a compact growth habit are ideal: lettuce, herbs, radishes, strawberries or bush beans. Avoid tall or heavily spreading varieties. Combine different types for a mixed planting scheme. Consider their light requirements – most vegetables need a sunny position.
You might also be interested in
- Build Your Own Raised Bed: The Complete Guide
- Build a Raised Bed with a Door: Step-by-Step Guide
- Build a Raised Bed from Scaffolding Boards: A Sturdy Construction Guide
- Build a Raised Bed with Seating: Practical and Stylish for the Garden
- Build or Buy a Garden Cabinet?
- Build Your Own Potting Bench: A Practical DIY Guide