
In brief: Insulating your home is a worthwhile project for experienced DIYers and can reduce heating costs for years to come. The key is choosing the right insulation material and installing it carefully. Start with the easily accessible basement ceiling, then check windows and roller shutter boxes before tackling the exterior walls. Work methodically and allow enough time for a careful installation that avoids thermal bridges.
Why should you insulate your home?
Good thermal insulation is one of the most effective ways to reduce your heating costs. It helps keep your home warm in winter and cool in summer. Germany's Energy Saving Ordinance (EnEV) sets minimum standards, but many older homes fall short.
Every insulation project you take on can improve your home's comfort. Cold walls and drafts become a thing of the past. You are also investing in your property's value and becoming less dependent on rising energy prices.
How do I get started with my insulation project? Planning
Start by assessing your home's current condition. Which areas feel cold? Where does condensation or even mold form? A thermal imaging inspection can reveal thermal bridges, but it is not essential when you're getting started.
Set priorities. Insulating the attic floor or basement ceiling often delivers the greatest benefit for relatively little effort. Work systematically: start indoors, then move outside; begin with lower areas, then work your way up.
Professional energy advice can give you peace of mind. An expert can identify hidden problem areas and recommend the most cost-effective order for the work. The consultation can pay for itself by helping you avoid costly mistakes.
Tools you need for home insulation
You will need basic DIY tools. A sturdy utility knife with replaceable blades is essential for cutting insulation materials. A folding ruler, level, and pencil will help you take accurate measurements.
To install furring strips or other framing, you will need a circular saw or handheld circular saw. A cordless screwdriver with a comprehensive bit set can save a lot of time. A sharp handsaw or the handy
make cutting wood easier.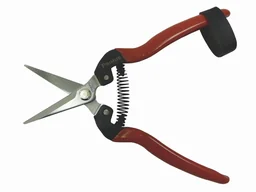
Important note
Always wear protective gear when working with mineral wool. Wear an FFP2 dust mask, safety goggles, and gloves. Fine fibers can irritate your airways and skin. Make sure the work area is well ventilated.
Insulating the basement: How to insulate the coldest part of your home
Insulating the basement ceiling is a classic place to start. It helps keep the floors above from getting ice-cold. For this project, you work from below, starting at the basement ceiling.
Install a wooden framework of furring strips on the ceiling. The strips should be as deep as your desired insulation thickness, but at least 8-10 cm. Then fit the cut insulation boards or batts between the strips. Make sure they fit snugly with no gaps.
Pro tip
Use special insulation anchors to fasten the boards. Their large disc-shaped heads hold the boards securely without compressing them too much. Use at least two anchors per board. On an uneven surface, level it with a thin layer of mortar or expanding foam.
Which insulation material is best for a basement?
Only moisture-resistant materials are suitable for basements. Expanded polystyrene (EPS) or extruded polystyrene (XPS) are common choices. XPS costs a little more, but has greater compressive strength and is also suitable for insulating basement walls below ground.
Special mineral wool boards approved for below-ground use are another option. They are vapor-permeable and help maintain a dry indoor environment. Always follow the manufacturer's instructions for the specific application.
Insulating exterior walls: A major project for experienced DIYers
Exterior wall insulation provides excellent thermal protection because it wraps the entire building envelope and minimizes thermal bridges, such as those around concrete floors. However, it is labor-intensive and requires scaffolding.
A sturdy
or sturdy rented scaffolding is essential for this work. Never work from a ladder alone. Safety must come first. Plan the work in sections to minimize exposure to the weather.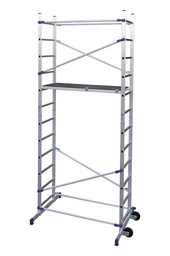
The most common method is an exterior insulation and finish system (EIFS). You attach EPS or mineral wool insulation boards to the cleaned wall with adhesive, secure them with anchors, then cover them with reinforcing mesh and a finish coat. This work takes practical skill and a good feel for the right adhesive mortar mix.
An exterior insulation system is like a suit for your home. It has to fit perfectly. A common beginner's mistake is applying the adhesive mortar unevenly. The boards must lie flat across their entire surface; otherwise, gaps can form and later cause cracks in the finish.
Interior insulation as an alternative
If exterior insulation is not an option, for example because the building is historically designated, interior insulation may be an alternative. It requires extra care because it shifts the dew point into the wall assembly.
You must install a vapor barrier on the room side to prevent condensation in the insulation layer. Capillary-active systems made from calcium silicate boards are a safe but more expensive option. Ask a specialist retailer for advice.
Windows and doors: Small seals, big impact
Before taking on major insulation work, eliminate drafts around windows and doors. Often, replacing the weatherstripping is enough. Also check the roller shutter boxes. Without insulation, they can be a major source of heat loss.
Insulated access panels or insulation mats added afterward can help. These jobs take little effort and can quickly reduce drafts.
Additional advice
Check for drafts with the candle test. Hold a lit candle near the joints around windows and doors. If the flame flickers, air is getting through. Also check where cables and pipes pass through walls. You can seal these spots quickly and effectively with special sealing foam or acrylic caulk.
Choosing the Right Insulation Material: An Overview
Not every material is suitable for every application. Mineral wool (glass or rock wool) is non-combustible, soundproofing and vapor-permeable. It is suitable for roofs, timber-frame walls and between-rafter insulation.
Polystyrene (EPS/XPS) is lightweight, water-repellent and affordable. It is the first choice for external wall insulation systems and basement insulation. Renewable materials such as wood-fiber boards or cellulose flakes score highly for their environmental performance and create a pleasant indoor climate.
Thickness vs. Performance: The Law of Diminishing Returns
Double the thickness does not mean double the insulation performance. The first few centimeters have the greatest effect. Beyond a certain thickness, the additional savings become smaller and smaller while costs continue to rise linearly.
Follow the requirements of the EnEV or the recommendations for available grants. For an exterior wall, 14-20 cm of insulation is generally considered economically worthwhile. For a basement ceiling, 6-10 cm is often enough to stop most heat loss.
Set Up Your Workspace and Follow Safety Precautions
Set up a sturdy
or a large, clean work area. You will need to cut insulation boards and often mix adhesive. Keep everything within easy reach.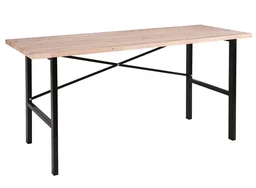
When working on the facade, watch out for falling tools or materials. Secure the construction area with barrier tape. Always wear a helmet and sturdy footwear when working on scaffolding. Electrical cables must be located and exposed or secured before work begins.
Conclusion: Insulate Your Home Step by Step
Start with a small, manageable project such as insulating the basement ceiling. Gain experience with the materials and work processes. Document your work with photos; this can help with any grant applications.
Do not hesitate to call in a professional for complex tasks such as installing an external wall insulation system, or outsource the entire project. Combining DIY work with professional services is often the most cost-effective solution. Every insulated square meter brings you closer to your goal: a warm, efficient and valuable home.
Frequently Asked Questions
- Which insulation material is best for DIY installation?
- For DIYers, mineral wool or wood-fiber batts and boards are often the easiest to work with. They can be cut with a utility knife and fitted between rafters or studs. Styropor panels (EPS) are easy to cut but require full-surface bonding. Avoid loose-fill blown insulation, as it requires specialist equipment and is not suitable for beginners.
- Can retrofitting insulation cause mold?
- Yes, if the insulation is installed incorrectly. The most common mistake is interrupting the vapor barrier or vapor retarder. This membrane must be installed on the warm, interior side of the insulation and be completely airtight. Otherwise, warm indoor air penetrates the insulation, cools down and the water it contains condenses. The result is moisture in the structure, which can lead to mold.
- Where does an uninsulated house lose the most heat?
- The greatest energy losses typically occur through an uninsulated basement ceiling (up to 15%), drafty windows and roller shutter boxes (up to 20%), and exterior walls (up to 25%). The roof can also cause enormous heat loss. Therefore, start your insulation work with the basement ceiling, as the effort is often limited and the results are immediately noticeable through warmer floors and fewer drafts.
- Do I need a building permit for exterior wall insulation?
- In most cases, yes. Exterior insulation changes the appearance of your home and is subject to local planning regulations. You will generally need approval from your local authority or municipality. Be sure to ask the relevant building department before starting work. A permit is usually not required for interior insulation or basement ceiling insulation.
- Is DIY insulation financially worthwhile?
- Doing the work yourself makes the project pay for itself faster. Material costs for insulating a basement ceiling with mineral wool are around 15-25 euros per square meter. With heating cost savings of 5-10%, the investment often pays for itself within a few years. Maintain high quality standards to prevent building damage that could result in expensive repairs.
You may also be interested in
- Home insulation: How to insulate walls and save energy
- DIY attic insulation: Costs and best methods
- How to install between-rafter insulation yourself
- Insulate your roof: How to save on heating costs and improve comfort
- How to plan home insulation properly
- Save energy at home: DIY tips for renovating your property