
In brief: When renovating a patio, first check the slope, sub-base and drainage. Remove the old surface, repair cracks, build up the sub-base correctly and install the right patio surface. Then add lighting, storage, shade and weather-resistant furniture.
Direct answer: When renovating a patio, first check the slope, sub-base and drainage. Remove the old surface, repair cracks, build up the sub-base correctly and install the right patio surface. Then add lighting, storage, shade and weather-resistant furniture.
A patio is exposed to weather, dirt and mechanical stress every day. Frost can split joints, standing water can damage the substructure, and incorrectly laid slabs can tip or break. A well-planned patio renovation therefore improves not only its appearance, but also its safety and durability.
When renovating your outdoor area, work in the right order: inspect the existing structure, prepare the area, repair the sub-base, replace the patio surface, and then plan the furniture and planting. This prevents new features from being installed on top of an existing moisture or drainage problem.
How do you plan a patio renovation?
Before ordering materials, measure the patio and document its condition. Measure the length, width and differences in height. Photograph cracks, sunken areas, damaged joints and transitions to the house wall.
Inspecting the existing structure in five steps
- Measure the area: Determine the number of square meters, including edge and step areas.
- Check the slope: Use a straightedge and spirit level to check whether rainwater runs away from the building.
- Inspect the surface: Tap slabs and tiles. A hollow sound indicates loose areas.
- Check the drainage: Inspect drains, channels and the connection to the facade.
- Determine the heights: Take door thresholds, steps, railings and the desired build-up height into account.
Mark the areas that need to be removed completely. An intact substructure can often be reused if it remains stable and the slope is correct. Loose slabs, softened joints and recurring puddles, on the other hand, indicate that the base should be rebuilt.
Determine the materials and tools
Choose the new surface only after inspecting the sub-base. Slabs require different layers than a wood or WPC patio. Also plan for edge profiles, spacers, jointing material, substructure supports and a solution for draining water.
For dismantling and preparation, you will need, among other things, a pointing trowel, rubber mallet, straightedge, spirit level, broom and a powerful scraper. Suitable garden tools make cleaning and maintenance easier. Allow extra material for offcuts and have a way to cover the area in changeable weather.
“A patio begins not with the surface, but with a stable sub-base that drains water reliably over the long term.”
Create a simple schedule. A medium-sized area usually requires several working days because dismantling, sub-base work, drying times and installation cannot be shortened indefinitely. Plan the furniture and plants only once the surface is stable and clean.
How do you inspect and repair the sub-base?
The sub-base determines the service life of every patio. An expensive surface will not remain level for long if water collects underneath or the base layer gives way. Therefore, remove the existing build-up wherever you cannot clearly remedy the damage.
Check the slope and drainage
A patio should direct rainwater away from the house. As a guide, a slope of around 1,5 to 2 percent is recommended, which means a height difference of about 1,5 to 2 centimeters per meter. Check the slope in several directions, not just at one point.
Water must not remain against the facade. Clean drainage channels, repair damaged channels and direct the water away in a controlled manner. At a transition to a lawn or flower bed, a clean edge prevents soil from being washed onto the surface.
Assess cracks, hollow areas and settlement
Depending on the cause, small surface cracks in concrete can be repaired. Wide cracks, sunken areas and hollow spots, however, often indicate movement in the sub-base. Remove loose areas completely and do not simply add new material on top of an unstable layer.
- Compact a new base layer in successive layers.
- Use frost-resistant material for outdoor areas.
- Separate the house wall and surface with a suitable edge or movement-joint profile.
- Maintain the planned build-up height exactly at doors and steps.
Substructure for different surfaces
Slabs and natural stone require a stable, level bed. Depending on the system, you may use crushed stone, grit, drainage mortar or a bonded construction. Ceramic patio slabs are often laid on pedestal supports or a solid bed, while wood and WPC require a ventilated substructure.
Important note
Stop work if water is collecting against the house wall, the sub-base is giving way over a large area or the waterproofing of a structure above it may be damaged. Do not build over such areas. A specialist contractor must inspect the cause, load-bearing capacity and drainage.
With an existing concrete slab, also check the height relative to the door threshold. New slabs, underlays and adhesive can significantly increase the build-up height. Also take the direction in which the door opens and the space needed for a drainage channel into account.
How do you renew patio flooring?
The right patio flooring depends on how you use it, the maintenance required, the installation height and your style. A family with children needs a slip-resistant, durable surface. If you like walking barefoot, choose surfaces that produce few splinters and do not heat up excessively. Also check that the flooring matches the façade, garden paths and steps.
Wood and WPC for a warm surface
Wood has a natural appearance and individual sections can be replaced if damaged. The decking boards require a precisely aligned, well-ventilated substructure. Leave gaps between the boards so rainwater can drain away and the material can expand and contract.
WPC combines wood fibres and plastic. It is easier to maintain than many types of wood, but can become very hot in the sun. Install WPC according to the manufacturer's instructions and maintain the recommended distances at the ends of the boards and around fixed structures.
Slabs, ceramic tiles and artificial grass
Natural stone and concrete slabs are suitable for a durable, clean design. Ensure an even bedding layer, sufficient joints and a slope without edges where water can collect. Large-format slabs leave little room for unevenness and require several people for transport and installation.
For a quick visual change on a level, stable base, modular solutions such as
, a 10-piece set of green patio tiles with artificial grass, may be worth considering. Before use, check that the system is suitable for your area, the existing installation height and the expected load.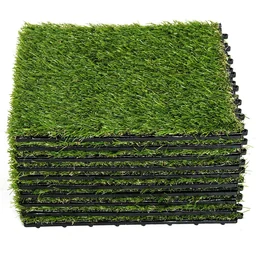
Renewing patio flooring: the right order
- Clear the area and remove the old flooring completely or section by section.
- Clean the base and mark cracks, sunken areas and damaged edge sections.
- Ensure adequate load-bearing capacity, slope and drainage.
- For wood or WPC, install the substructure with sufficient ventilation.
- Lay the first row precisely. It determines the entire joint pattern.
- After each section, check alignment, height and joint width.
- Only finish the edges, steps and transitions after completing the main area.
“For outdoor areas, careful planning of slopes, joints and connections determines their service life.”
When laying slabs, always work from the solid edge and avoid walking unnecessarily on freshly laid surfaces. For wood, protect cut edges according to the manufacturer's instructions. Remove mortar and adhesive residue immediately before it hardens.
How do you turn your renovated patio into an outdoor oasis?
Once the technical renovation is complete, it is time to focus on the design. Divide the area into clear zones for dining, seating, plants and pathways. Keep circulation areas clear and do not position furniture where it blocks doors, drains or steps.
Choose functional furniture and storage
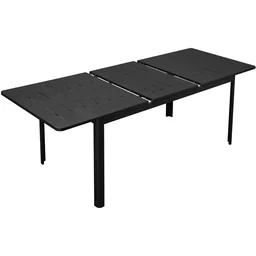
An extendable table adapts to changing numbers of guests.
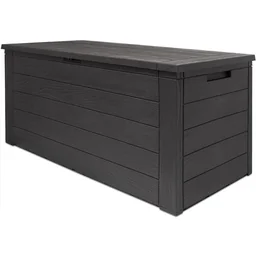
Cushions, garden tools and toys need a dry, easily accessible place. An outdoor storage box such as
Plan for sun and weather protection
Good sun protection protects both people and surfaces. Sun protection ideas range from a parasol and sun sail to a fixed awning. Check the wind load, fixing points and how the shade moves at different times of day.
A patio cover provides short-term weather protection during renovation work. For a patio heater,
, a suitable cover protects the appliance from rain and dirt. Allow heaters to cool down completely before using a cover.
Plants, pathways and small wood projects
Large planters structure the patio without permanently altering the ground. Choose plants suited to the location and use saucers so that watering does not run into the joints. A narrow planting strip visually connects the patio with the garden.
For adjoining areas, plan gravel garden paths with a stable edging and a sufficient sub-base. Small garden wood projects such as a bench, plant stand or privacy screen add individual accents. In the garden and outdoor range, you will find additional solutions for connecting your patio and garden.
Pro tip
Before final assembly, lay out the furniture, planters and sun protection to test the arrangement. Photograph the layout from the doorway. This will help you spot bottlenecks, passageways that are too narrow and awkward shaded areas before drilling or positioning heavy elements.
Protect furniture with suitable covers if it is left outside permanently. In the category covers for garden furniture, you will find solutions for different furniture sizes. A cover extends the furniture's service life, but does not replace occasional drying and cleaning.
How much does patio renovation cost, and how can you keep it looking great?
Calculate costs realistically
Divide your budget between dismantling, disposal, the base, paving, edge finishes, tools and labour. With a complete renovation, dismantling and disposal can account for a significant proportion of the cost. An inexpensive surface becomes costly if you install it on a damaged sub-base and have to redo the work soon afterwards.
Allow for cutting waste and, where possible, order materials from the same batch. Colour and size variations may be visible with natural stone and ceramic paving slabs. You should also set aside some money for unexpected repairs to drains, joints and connections.
What you can do yourself
Clearing, cleaning, measuring, dismantling and simple assembly work are often suitable for DIY. Laying click tiles or oiling a wooden patio can also be done successfully with careful preparation. The risk of damage increases considerably when handling heavy slabs, electrical connections or work on the building's waterproofing.
The search term DIY loft conversion refers to a different type of project than a ground-level patio. As soon as you plan a roof terrace on a garage roof, structural calculations, waterproofing, railings, drainage and fall protection all come into play. Have these points checked before buying materials or opening up the roof covering.
Cleaning and maintenance
Sweep away leaves and sand regularly. Remove stains with a suitable cleaner and avoid harsh products that can damage joints, wood or coatings. For regular cleaning, use
, a 2-in-1 indoor and outdoor floor wiper with a telescopic handle and two attachments.
In spring, check joints, edge finishes, adjustable supports, screws and drains. Oil wooden patios as needed and clean WPC according to the manufacturer's instructions. With paving slabs, check whether any individual elements are moving or water is taking an unusually long time to drain.
Additional advice
Document the material types, laying plan and maintenance intervals. Store spare tiles, colour codes and manufacturer's information in a dry place. If repairs are needed later, you can use them to replace individual elements without having to buy an entirely new patio surface.
A successful renovation ends with a quick check: Does water run away from the house, are all the slabs secure, do doors open freely and do the paths remain safe? If everything is in order, add decorations and plants gradually. This will keep your new patio durable, easy to maintain and a pleasant focal point of your outdoor space for years to come.
Frequently Asked Questions
- How much does it cost to renovate a patio?
- The cost depends on the area, dismantling, sub-base, surface material and the amount of work you do yourself. Create separate budget items for disposal, materials, edge finishes and labour. A stable base will save you repair costs later. Compare quotes only once all services and drainage requirements have been clearly specified.
- What type of base is suitable for a new patio?
- The existing base must be stable, frost-resistant and provide adequate drainage. A professionally constructed hardcore or concrete base is suitable for paving slabs and tiles. Timber and WPC are usually laid on a levelled supporting structure. Check for cracks, hollow areas and standing water before ordering the new surface material.
- Can I replace the patio surface myself?
- Yes, many DIY enthusiasts can handle simple tasks such as dismantling, cleaning, laying click tiles or oiling wood themselves. The more difficult aspects are the sub-base, slope, waterproofing and large natural stone slabs. Follow the instructions for this work and call in a professional if the building structure has been damaged.
- How long does a renovated patio last?
- Its lifespan depends mainly on the sub-base, drainage, material and maintenance. A properly constructed wooden patio needs regular cleaning and oiling. Stone, ceramic and WPC can last for many years when installed correctly. Check the joints, edge finishes and drains at least once per season.
- Do I need planning permission for a patio on a garage roof?
- A roof terrace on a garage roof can affect the structural integrity, waterproofing, railings, drainage and fire safety. Before planning anything, check the local building regulations and have the structure assessed by a qualified professional. Never drill or screw through existing roof waterproofing yourself.
You may also be interested in
- Laying patio slabs: How to choose them and create your oasis
- Renovating an outdoor staircase: Step by step to a new staircase
- Renovating a facade: Step by step to a fresh new look
- Patio design: Before-and-after inspiration
- Patio design: Planning, construction and maintenance for your outdoor living room
- Flat roof renovation: Step-by-step guide