
In brief: You can quickly make one-of-a-kind Christmas place cards with natural materials such as fir branches, cinnamon sticks, or dried orange slices. Start with high-quality paper or cardstock, then decorate with handwriting, stamps, or embossing. Add a short personal message on the back to give your guests a keepsake to take home.
Christmas Place Cards: Personal DIY Ideas for Guests
Homemade place cards are more than just placeholders. They offer a warm welcome and show your guests how much you appreciate them. With a few simple steps, you can turn everyday materials into festive table accents.
You don’t need an expensive craft kit. Often, natural finds and items left over from the kids’ room are all you need. Here are some practical ideas.
How do I choose the right shape for my place cards?
The base determines how sturdy your card will be and how it looks. Classic rectangular or square cards made from heavyweight cardstock never go out of style. They’re easy to write on and decorate.
Try a less traditional shape. A Christmas tree, star, or bell cutout instantly adds a festive touch to the table. Use a template cut from thick cardboard.
Folded cards give you room to write a personal message inside. Your guests can take them home as a keepsake.
A place card makes its first impression through its shape. An unusual silhouette sparks curiosity and builds anticipation for the meal.
Which materials create a festive look?
Natural materials bring a warm, welcoming feel to your table. Try textured paper such as watercolor paper or matte photo paper. Glossy or metallic cardstock adds an elegant sparkle.
Mix and match textures. Glue a piece of jute or cotton ribbon beneath the name. A small piece of raffia adds rustic charm.
Keep practicality in mind, too. Your card should stand securely or attach safely to a glass. Test your design before your big crafting session.
Pro tip
Use gold or copper foil to punch out delicate snowflakes or stars. Attach them to the card with double-sided tape. The metallic accents catch the candlelight beautifully.
Collecting and preparing natural materials
A walk outdoors can turn up beautiful decorations. Collect small pinecones, thin fir branches, rose hips, or acorns. Let the materials dry thoroughly before using them.
Slice an orange thinly and dry the slices in the oven at a low temperature. They’ll have a delicate scent and look lovely on a card.
Tie small cinnamon sticks or star anise together with thin gold thread. Glue the bundle to the card as a focal point.
How can I display names attractively?
The lettering is the centerpiece. Neat handwriting feels personal and thoughtful. Practice writing each name on scrap paper before adding it to the card.
Choose the right pens. Opaque acrylic paint markers in gold, silver, or white work well on dark backgrounds. Fine-tip brush pens with waterproof ink give you precise control.
If you’re unsure about your handwriting, use stamps or a printer. Choose an elegant, easy-to-read font. Print the names on clear sticker paper and transfer them to the card.
Choosing the right lettering color makes all the difference. A dark green name on a cream background looks elegant and festive, while gold on navy blue feels especially refined.
Creative alternatives to writing directly on the card
Write the name on a separate tag. Attach it to the top of the card with a miniature wooden clothespin for a modern, relaxed look.
Trace the name into the card with an embossing stylus. Then gently rub a white or gold wax crayon over the indented lettering. The color will stay in the grooves.
For a festive kids’ room or the family table, children can write names with glitter glue. It dries with a raised finish and a beautiful sparkle.
Important note
Test pens and glue on a sample card first. Some markers bleed on glossy paper, while solvent-based glue can soak through thin paper and spoil your design.
Which festive accents make the biggest impact?
Small details can make all the difference. A single strand of glitter ribbon wrapped around the card may be all you need. Tie a small bow with satin ribbon or raffia.
Beads, sequins, or small rhinestones add a touch of sparkle. Use them sparingly, perhaps as the dot over the i in a guest’s name.
For a luxurious touch, use real gold leaf flakes. Dab on some glue, sprinkle on the flakes, and tap off the excess.
Meaningful decorations: Christmas symbols
The star symbolizes the Star of Bethlehem. Punch or cut one from gold foil. Glue a small star to the top edge of the card for a sparkling finishing touch.
Pinecones represent nature and resilience. Glue on a tiny cone or a few individual scales as a 3D accent. Pair it with a Christmas throw pillow in similar colors for a coordinated look.
A bell symbolizes joy and celebration. Attach a tiny metal bell to a corner of the card with ribbon. It will chime softly when someone moves the card.
Additional advice
Tie your place cards in with the rest of your table decor. Use ribbons or colors that also appear in your napkin rings, table runner, or area rugs. A coordinated look will catch your guests’ eyes.
How do I display or attach place cards securely?
Folded cards stand on their own. Flat cards need a stand. Glue a narrow strip of cardstock to the back at a right angle, about one third of the card’s height.
Small clear acrylic holders are an elegant solution. They’re almost invisible and keep the focus on your design. Or place the card in a small wooden clothespin to use as a stand.
To attach a card to a champagne glass, use a hole punch and ribbon. Punch a hole in the top corner of the card. Thread decorative ribbon through it and tie it in a loop around the stem of the glass.
Practical tools for precise work
A sharp utility knife and metal ruler are essential for clean cuts. Always cut on a cutting mat to protect your tabletop.
Precision pliers are handy for bending wire or positioning tiny beads. Use tweezers to place small elements accurately.
A set of
comes in handy for more than precision mechanics. The small screwdrivers can help you position glued-on elements or remove adhesive residue.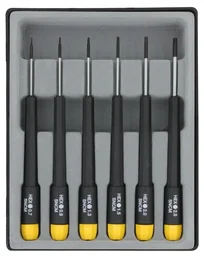
How do I store handmade place cards until the celebration?
Store the finished cards flat under a weight. Place them between clean, smooth sheets of paper and set a heavy book on top. This helps keep the corners from curling.
Store cards with large 3D decorations, such as pine cones or oversized bows, separately in a flat box. Place tissue paper between the layers to prevent pressure marks.
Check the cards a day or two before the celebration. You may need to reattach loose decorations or dust them off.
Final preparations on the day
Set out the cards only after the table is fully set. This helps prevent them from tipping over or being damaged by condensation from glasses.
Keep a small container of glue handy for emergencies. If a decoration comes loose just before the meal, you can fix it right away.
Enjoy the moment your guests discover their personalized place cards. Seeing them enjoy this handmade detail is the best reward for your effort.
With these ideas, you can create place cards that reflect your personal style. They combine creativity and warmth to make your Christmas table truly unique. Start collecting materials and planning now. The most wonderful time of the year is the perfect setting for handmade holiday decor.
Frequently Asked Questions
- What material is best for handmade place cards?
- Sturdy cardstock or watercolor paper weighing 200-300 g/m² makes the best base. It stands up well and is easy to write on, paint, or decorate with natural materials. Avoid paper that is too thin and creases easily, or very smooth surfaces that can cause paint to run.
- How can I keep evergreen sprigs or other natural decorations fresh on a place card?
- Use only dried or preserved natural materials, such as moss and dried orange slices, or artificial evergreen sprigs. Fresh greenery wilts quickly and can leave stains. Attach the decorations with hot glue or strong craft glue.
- Can I make place cards with children?
- Yes. Choose simple techniques such as potato-stamp printing, finger painting, or gluing on pre-cut paper shapes. Prepare the card bases and let the kids get creative. They’ll make personal works of art for the family table.
- What font and size are easiest to read on place cards?
- A clear sans-serif font such as Arial or Helvetica, at least 14 point, is easy to read. Write or print each name in the center in a color that contrasts with the card. Avoid ornate fonts that are too small.
- How can I create a cohesive look for my place cards?
- Choose a color scheme (e.g., red, gold, green) and a recurring motif (stars, pine cones, bows) for all the cards. Vary the arrangement or combination of materials while sticking to this theme. This creates a harmonious table setting that still feels interesting.
You may also be interested in
- Paper Christmas crafts: festive decoration ideas for the whole family
- Make your own Christmas decorations: sustainable ideas using natural materials
- Make your own Christmas ornaments: creative DIY ideas for a one-of-a-kind tree
- Christmas craft ideas: templates and instructions
- Build a Christmas table pyramid: DIY wooden holiday decor
- Design your own invitation cards: creative DIY ideas