
In brief: A wood kitchen backsplash is a stylish DIY project that adds warmth to your kitchen. Hardwoods such as oak and walnut, as well as specialty wall panels, are good options. Properly sealing the wood with varnish or hardwax oil is essential to protect it from moisture, grease and heat. Careful installation helps ensure a durable, professional finish.
Tile is practical, but it can sometimes feel cold and impersonal. Add character and a welcoming warmth to your kitchen with a wood backsplash. It protects the wall from splashes and becomes a focal point in the room. With some planning and the right tools, you can install this stylish wood wall cladding yourself.
Why choose a wood kitchen backsplash?
Wood can transform the feel of a room. Its natural grain and warm tones create a cozy, welcoming atmosphere. Each type of wood has its own character, from rustic oak to elegant walnut, giving your kitchen a look all its own.
Wood wall cladding works with many interior styles. In a country-style kitchen, it adds to the traditional, cozy feel. In a modern, minimalist kitchen, it creates a striking contrast with smooth, cool surfaces. Wood is also a natural fit for Scandinavian and industrial-style interiors.
Compared with the work involved in tiling, installing a wood backsplash is a manageable DIY project. You won't need a specialty tile saw or grout. With basic woodworking skills, you can achieve a professional-looking result.
Materials with a story bring a home to life. Wood ages gracefully and carries the marks of everyday life—that's what makes it so special in a central room like the kitchen.
Which types of wood work for a kitchen backsplash?
Your choice of wood affects both the look and durability of your kitchen backsplash. Some types of wood handle kitchen conditions such as moisture, steam and grease splashes better than others.
Solid wood: The durable classic
Hardwoods are the top choice for a solid wood backsplash. Oak, beech, maple and walnut are especially strong and durable. Their dense grain absorbs less moisture. One major advantage of solid wood is that you can sand the surface and reseal it if it gets scratched or develops stubborn stains. That means your backsplash can look like new again, even years later.
Wall panels and cladding: The practical alternative
Ready-to-install wall panels and wood cladding make installation much easier. They often consist of thin layers of wood attached to a backing board. You can find them in countless styles, from reclaimed wood looks to modern 3D textures. They're easy to cut and can be glued to the wall like a large tile.
Plywood or OSB: The rustic industrial look
For a modern, budget-friendly look, sheet materials such as plywood or OSB (oriented strand board) are good options. Birch plywood, with its light color and visible layered edges, has a particularly clean, minimalist look. OSB brings a raw, industrial feel to the kitchen. These materials are more sensitive to moisture, so it's essential to seal them completely and protect all seams.
Important note
Untreated wood isn't suitable for a kitchen backsplash. A high-quality, water- and heat-resistant finish is essential. Take extra care to seal the edges and the cutouts for outlets.
Step-by-step guide: DIY wood wall cladding
With good preparation and careful work, you can install a new kitchen backsplash without difficulty. Take your time with each step for a polished result.
1. Planning and preparation
Measure the backsplash area carefully. Remember to account for cutouts for outlets, light switches and cabinets. Make a sketch with all the measurements. The wall must be clean, dry and even. Remove any old wallpaper and fill larger holes. Protect your countertops and floor with a heavy-duty drop cloth.
2. Cutting the material
Transfer the measurements from your sketch to the wood panels or boards. Use a carpenter's square to mark precise 90-degree angles. A circular saw with a guide rail works well for long, straight cuts. Use a jigsaw to cut openings for outlets. A high-quality saw blade set such as the
helps create clean cuts with minimal tear-out and handles different types of wood with ease.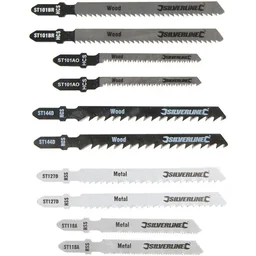
Expert tip
Test your chosen finish on a scrap piece of wood first. This shows you how it affects the wood's color and grain, so you can decide whether you like the result. Let it dry completely before making your decision.
3. Treating and sealing the wood (The most important step!)
This step determines how long your wood wall cladding will last. Sand all the cut pieces smooth with fine-grit sandpaper (180 grit). Thoroughly remove all sanding dust. Apply the finish in several thin coats, lightly sanding between coats.
- Varnish (e.g. marine varnish): Creates the most durable, fully sealed surface. It's ideal for the area behind the sink. Choose a food-safe varnish.
- Hardwax oil: Soaks into the wood and protects it from within, while preserving its natural feel. It may need to be reapplied once a year.
- Epoxy resin: Creates an extremely hard, glass-like, waterproof surface. Applying it takes experience.
4. Installing the backsplash on the wall
There are two common ways to attach wood wall cladding. For direct installation, apply construction adhesive to the back of the panels in zigzag lines and press them firmly against the wall. Weigh down the boards or brace them until the adhesive has fully cured.
If the wall is uneven or you need to run cables, install a substructure of thin wood battens secured to the wall with wall anchors. You can then screw or nail the wood panels to the battens. For fine adjustments, such as making a perfect fit around an outlet cover, a
a wood chisel set is invaluable.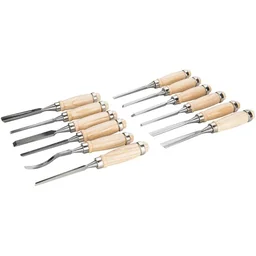
How do I care for and clean a wood kitchen backsplash?
Proper care keeps your wood backsplash looking beautiful for years. Wipe up splashes right away with a soft, slightly damp cloth. If needed, use a mild soapy solution, but never use harsh or abrasive cleaners. They can damage the sealant.
Always dry the surface thoroughly to prevent water spots. On an oiled surface, you can carefully remove stubborn stains with fine steel wool, then re-oil the area. An oiled backsplash benefits from a fresh coat of the appropriate oil about once a year.
Additional tip
Avoid cutting directly on the countertop in front of the wood backsplash. Always use a cutting board. This protects both your countertop and the bottom edge of the wood cladding from cuts and moisture.
Creative ideas for your wood kitchen design
A wood backsplash offers countless design possibilities. Vary the direction in which you install the boards: horizontal boards make the room look wider, while vertical boards make it appear taller. A herringbone pattern takes more work, but makes a real statement. The same care that goes into looking after high-quality wooden toys pays off when creating a detailed kitchen design.
Experiment with colors and finishes. You can stain the wood dark, paint it any color, or even char it to create a unique texture using the Shou Sugi Ban technique. This intricate surface treatment can evoke the fine craftsmanship of wooden animals & figures and give your kitchen an artisanal touch. Combine wood with other materials, for example, by installing a stainless steel panel behind the cooktop.
The best way to predict the future is to create it yourself.
Your kitchen is more than just a workspace. It is a living space. A DIY wood kitchen backsplash is not only a practical splash guard, but also an expression of your personality. It is a rewarding project that gives your kitchen character and brings you joy every day.
Frequently asked questions
- What type of wood is best for a kitchen backsplash?
- Hardwoods such as oak, walnut, maple, or beech are ideal because they are durable and sturdy. Acacia and bamboo are also dense options. It is important to seal the wood thoroughly to protect it from moisture and stains. Ready-made wall panels are another option.
- How do you properly seal wood in a kitchen?
- For kitchen use, you need a food-safe, waterproof sealant. Polyurethane varnishes (marine varnish) offer the highest level of protection. Hardwax oils preserve the wood's natural feel, but may need to be reapplied more often. Apply several thin coats and lightly sand between coats.
- Is a wood wall behind a stove safe?
- Yes, provided you take the right precautions. Maintain the minimum distance from the wall specified by the stove manufacturer. An additional glass or stainless steel protective panel directly behind the cooktop offers maximum protection from heat and grease splashes. It is easy to clean and preserves the look of the wood.
- How do you clean a wood kitchen backsplash?
- For everyday cleaning, use a soft, slightly damp cloth and mild soapy water. Always wipe the surface dry to prevent water spots. Avoid harsh cleaners, abrasive products, or steel wool, as they can damage the sealant.
- How much does a DIY wood kitchen backsplash cost?
- Costs vary widely depending on the type and size of the wood. Inexpensive OSB or plywood sheets are available for under 20 euros per square metre. Solid hardwood boards or high-quality wall panels can cost between 50 and 150 euros per square metre. You will also need to budget for sealant and installation materials.
You may also be interested in
- Kitchen backsplash as a splash guard: DIY planning & installation
- Cladding a wall with wood: step-by-step guide
- How to install wood paneling and transform your four walls
- DIY kitchen backsplash: create a trendy concrete look
- Build your own wooden privacy screen: instructions and ideas
- Refresh your kitchen cabinets for a fresh kitchen makeover