
In brief: You can make juice at home in three ways: cold-press juicing with a slow juicer for maximum nutrients, steam juicing for large quantities and long shelf life, or simply using a saucepan. Each method is suitable for different types of fruit and purposes, from fresh enjoyment to storing supplies.
Is an apple tree in your garden bending under the weight of its fruit? Are your berry bushes producing more than you can eat fresh? Then it is time to turn your harvest into liquid gold. Homemade juice not only tastes more intense than shop-bought juice, you also decide exactly what goes into it. No artificial additives and just the right level of sweetness. We will show you three tried-and-tested methods for making juice at home, from quick and fresh to long-lasting for the winter.
Why make your own juice? The benefits at a glance
Reaching for ready-made juice at the supermarket is easy. But making your own offers unbeatable advantages. You have complete control over the ingredients. No hidden sugar, preservatives or artificial colours. Just the pure taste of the fruit, exactly as it should be. This is especially valuable if you care about a conscious diet.
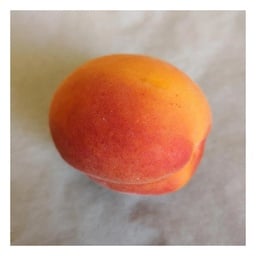
When you process fruit straight from your own garden or a local farmers' market, you know exactly where it comes from. You make use of seasonal surpluses and prevent valuable food from going to waste. A bumper harvest of your own apricot 'Mombacher Frühe' can become a delicious supply for the whole year. This not only saves money, but also helps the environment by avoiding transport distances and packaging waste.
Freshly pressed juices provide vitamins and secondary plant compounds in concentrated form. They are a valuable addition to a balanced diet, but should not completely replace whole fruit.
Preparing properly: fruit and equipment
Good preparation is half the battle when it comes to excellent juice. The quality of the starting ingredients determines the final result. Use only ripe, healthy and aromatic fruit. Windfalls are suitable as long as you generously remove bruised and rotten areas. A few individual worm-damaged spots are not a problem—simply cut them out.
Wash all fruit thoroughly under running water. Further preparation depends on the method and type of fruit. Apples and pears must be quartered or cut into eighths, with the core removed. Remove the stones from stone fruit such as cherries, plums and apricots. Berries can usually be processed whole. A clean work surface and clean tools are essential to avoid compromising the juice's shelf life.
Additional advice
Combine sweet and tart fruit for a balanced flavour. Classic pairings include apple and blackcurrant, pear and raspberry, or apple and rhubarb. A small dash of lemon juice also prevents the juice from turning brown during processing.
Method 1: Cold-press juicing for maximum nutrients
When cold-press juicing, often using a so-called slow juicer, juice is extracted from the fruit by slowly pressing or crushing it. Very little heat is generated, helping to preserve heat-sensitive vitamins, enzymes and aromatic compounds as effectively as possible. The result is a fresh, natural juice full of nutrients that should be consumed immediately.
How does a slow juicer work?
A slow juicer uses one or two pressing screws that rotate slowly. They crush the fruit and vegetables and press the juice through a fine sieve. The dry residue, known as pulp, is ejected separately. This gentle method produces a high juice yield and an intense colour.
Step-by-step guide to cold-press juicing
- Prepare the fruit: Wash the fruit and cut it into pieces that fit into your appliance's feed chute. Remove hard stones and stalks.
- Start the appliance: Assemble the juicer according to the instructions and place a container under both the juice outlet and the pulp outlet.
- Extract the juice: Add the fruit pieces to the appliance gradually. Press down gently with the pusher—the machine does most of the work itself.
- Enjoy: Pour the fresh juice into glasses and ideally drink it straight away. In a sealed bottle, it will keep in the refrigerator for around 24 to 48 hours.
Pro tip
Do not throw away the pulp! It is rich in fibre. Mix apple or carrot pulp into your next cake batter or muesli, or use it as the basis for vegetarian fritters. It is also suitable for thickening sauces.
Method 2: Steam Juicing for Large Quantities and Long Shelf Life
If your garden rewards you with kilos of berries, apples or stone fruit, a steam juicer is the right choice. This method is ideal for processing large quantities of fruit efficiently and preserving the juice immediately. The hot steam breaks down the fruit cells and the juice collects – already pasteurised and ready for bottling.
How a Steam Juicer Is Structured
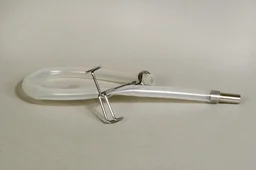
A steam juicer consists of three parts. At the bottom is the water pot, which generates the steam. Above it is the juice collector with a drain hose. At the top is the fruit basket with a perforated base, which is filled with fruit. The rising steam cooks the fruit, the juice drips into the middle section and can be bottled hot directly from there. A suitable drain hose with clamp ensures clean and safe working.
How to Steam Juice Fruit
- Prepare the appliance: Fill the bottom pot about three-quarters full with water and bring it to the boil.
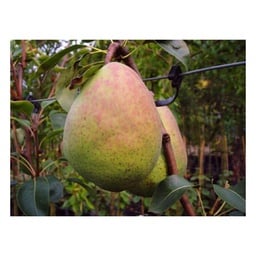
- Add the fruit: Wash the fruit. Place smaller fruit such as berries whole in the fruit basket, while larger fruit such as apples or the pear 'Alexander Lukas' should be roughly chopped. You can sprinkle the fruit with sugar in layers if desired.
- Extract the juice: Assemble the parts of the juicer and place it on the hot hob. Clamp the drain hose shut initially. After 30-60 minutes, depending on the type of fruit, enough juice will have collected.
- Bottle while hot: Let the hot juice run directly from the hose into previously sterilised bottles. Seal the bottles immediately. The juice will now keep for many months.
Steam juicing is a tried-and-tested method of preserving the summer harvest for winter. The heat pasteurises the juice, and when bottled hygienically it will keep for months without losing its flavour.
Method 3: How to Make Juice Without a Juicer – The Stovetop Method
Don't have a juicer but still want to make delicious juice from your fruit? No problem. You can also do it with a large pot, a sieve and a clean cloth. This method is particularly good for very soft or juicy fruit such as berries and produces a rich, nectar-like juice or a perfect base for jelly.
How to Do It: Making Juice in a Pot
This traditional method requires only basic kitchen equipment from your trusted shop. It is straightforward and ideal for smaller quantities.
- Cook the fruit: Place the prepared fruit in a large pot. Add a small amount of water to prevent it from burning (e.g. 200 ml per 1 kg of fruit). Bring everything to the boil and simmer until the fruit is soft and falling apart.
- Strain the fruit: Line a fine sieve with a clean tea towel or straining cloth and place it over a large bowl. Pour the cooked fruit mixture into it.
- Leave to drain: Leave the juice to drain for several hours or overnight. For clear juice, do not squeeze the cloth. If you want a higher yield and don't mind cloudy juice, you can gently press the mixture.
- Process the juice: You can now sweeten the collected juice to taste and boil it briefly again to preserve it before filling it hot into bottles.
How Do You Preserve Juice? Bottling and Storage
Whether you use a steam juicer or a pot, hygiene is essential for long-term storage. Only clean working practices and the correct bottling technique will prevent mould growth and fermentation. The key to success is hot-filling sterilised bottles.
Sterilising Bottles and Lids
Thoroughly clean glass bottles with screw tops and their matching lids using washing-up liquid and hot water. Rinse them well. To sterilise them, place the clean, still-wet bottles in the oven at 130 °C for about 15 minutes. Boil the lids for a few minutes in a small pot of water.
Important note
Work quickly and only handle the sterilised bottles and lids on the outside. The juice must be at least 75-80 °C when bottled to kill germs and create a vacuum in the glass.
The Bottling Process
Fill the boiling-hot juice into the hot bottles, stopping just below the rim. A funnel is very useful here. Seal the bottles tightly immediately with the sterilised lids. Then place the bottles on their sides for a few minutes so that the hot liquid also sterilises the lid and the remaining air space. Once cool, label the bottles with their contents and date. Store the juice in a cool, dark place such as a cellar or pantry. Your treasures from the Garden + Outdoor range will be perfectly preserved this way.
Conclusion: Fresh Juice, Exactly to Your Taste
Making your own juice is a rewarding task that rewards you with pure, unadulterated flavour. The cold-press method is ideal for an immediate vitamin boost. Steam juicing effortlessly handles a large harvest and preserves summer in a jar. And the simple stovetop method makes it possible to get started without specialist equipment. Whichever method you choose, you will turn your fruit into a valuable food and enjoy the taste of your garden all year round.
Frequently Asked Questions
- Which fruit is best for juicing?
- Almost any fruit is suitable for juicing. Apples, pears and grapes are classic choices with a high juice yield. Berries, cherries and stone fruit are ideal for steam juicing. Hard vegetables such as carrots and beets are best combined in a cold-press juicer. Avoid very mealy or starchy fruits such as bananas.
- Do I need to add sugar to the juice?
- No, it is not essential. With ripe, sweet fruit, the natural sweetness is often enough. However, sugar can extend the shelf life and balance the flavor of very tart fruits such as rhubarb or quince. Add it to taste and consider how you plan to use the juice.
- How long does homemade juice last?
- The shelf life depends on the method used. Fresh cold-pressed juice keeps in the refrigerator for around 2-3 days. Juice bottled hot from a steam juicer or saucepan will keep for at least 12 months if prepared hygienically and stored in a cool, dark place. Opened bottles should always be refrigerated.
- Can I reuse the pulp left over from juicing?
- Yes, absolutely. The pulp—the solid fruit residue—contains valuable fiber. You can use it to make fruit spreads, bake it into cakes and muffins, add it to granola, blend it into smoothies, or even use it to make vegetable patties or fruit leather. This reduces waste and helps you use the whole fruit.
- Why is my homemade juice cloudy?
- Cloudiness in juice is usually natural and does not indicate a quality issue. It consists of fine fruit particles and suspended solids. Cold-pressed juices are often naturally cloudier. When cooking or steam juicing, you can filter the juice through a fine cloth to make it clearer, but this will remove some of the fiber.
You may also be interested in
- Juicer Review & Comparison 2026: The Best Machines Tested
- Make Your Own Elderflower Syrup: An Easy DIY Recipe
- How to Preserve Homemade Food: Tips for Long-Lasting Storage
- Make Your Own Sauerkraut: Use Unusual Ingredients
- How to Make Jam: Easily Preserve Sweet Fruit at Home
- Preserve Your Harvest: How to Stock Your Pantry